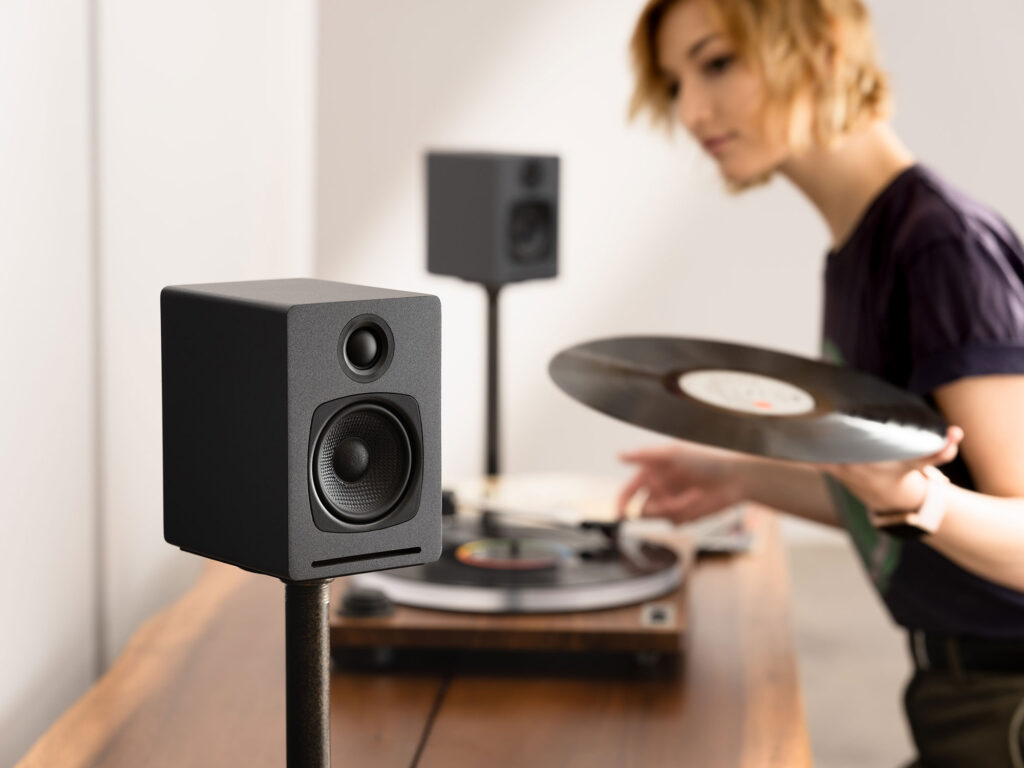

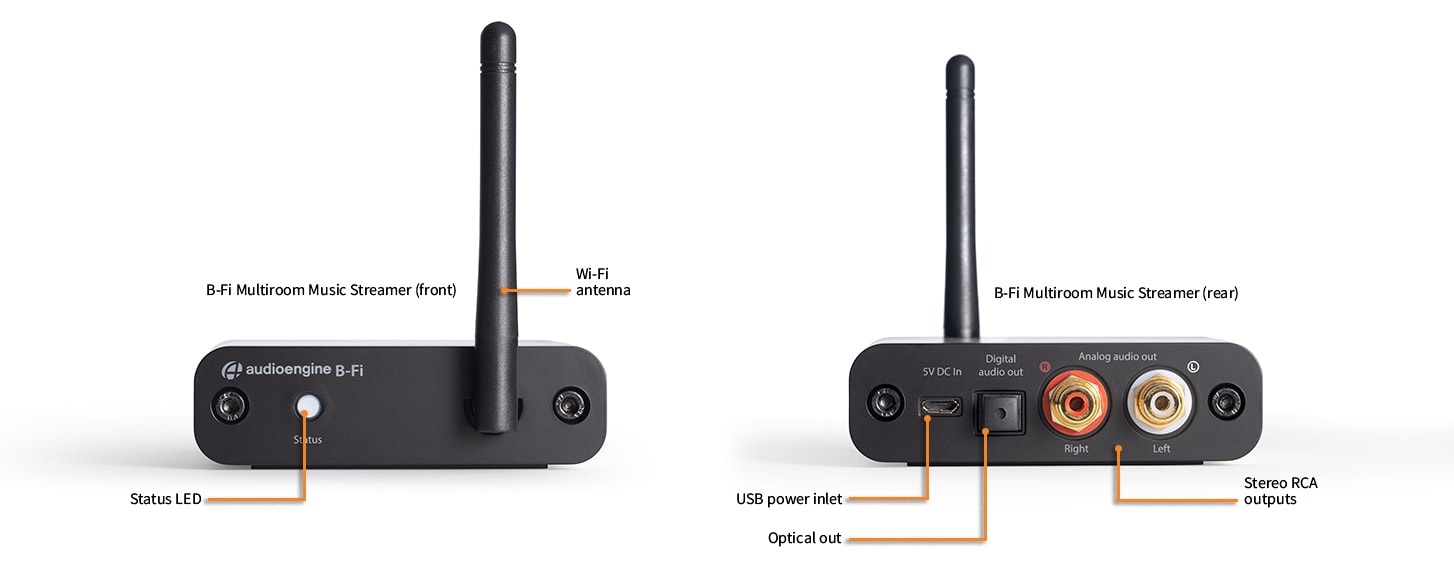
B-Fi Multiroom Stereo Adapter w/Wi-Fi (Discontinued)
With B-Fi:
- Stream with Airplay, Spotify, TIDAL or Amazon Music players directly
- Stream CD or 16 bit audio
- Connects to all online streaming services and personal libraries
- Allows for grouping(s) of multiple B-Fi adapters
- Cast audio to one or many B-Fi units simultaneously
- Utilizes a high fidelity 16 bit DAC with optical and RCA output
Technical Specifications
General Specifications
Wi-Fi Input
802.11 b/g/n (2 GHz)
Audio output
Analog, optical
Output level
2V RMS
Sample rates
32 - 44.1kHz
Bit depths
16 bit
Interfaces
AirPlay, DLNA, UPnP
Processor
AP8064 ARM
DAC
ES9023
Signal-to-noise-ratio
-105dB
Distortion
THD+N, 0.01%
Power
Micro USB
Power requirements
5V, 300ma
Product dimensions
3.5 x 3 x 1
Product weight
5 oz.
Shipping weight
1.0lbs (0.5kg)
Shipping box dimensions
11 x 7 x 3
Environmental Requirements
Operating temperature: 32° to 105°F (0°C to 40°C)
Storage temperature: -4°0 to 115°F (-20°C to 46°C)
Relative humidity: 5% to 95% non-condensing
Included accessories
RCA audio cable (3ft/1m)
Power adapter with detachable cable
Microfiber bag
Setup guide
Quickstart Guide
B-Fi Quick SetupStep 1: Download the free Audioengine app from the Apple App Store for iOS or from Google Play for Android. This is what you need to set up and configure your B-Fi. No need to install or open this app yet as we first need to connect B-Fi to your music system.
Step 2: Connecting B-Fi to your music system
Step 3: Connect the included RCA audio cable (or TOSLINK digital optical cable) between B-Fi and your music system or powered speakers.
Step 4: Connect the included power cable between the power supply and B-Fi, then plug the power supply into a functioning power outlet.
Step 5: Turn on your music system and set the volume level so you can hear the voice and audio prompts during setup.
Step 6: The B-Fi Status button will blink rapidly for 15 seconds, then a piano tone will play through your music system. The B-Fi Status button will now blink more slowly and a voice will say: "Entering setup mode. Follow the instructions in the app to finish the setup."
If no piano tone or voice is heard after 15 seconds, check your music system volume level.
B-Fi will remain in setup mode (slow-blinking Status button) for 5 minutes before timing-out.
To go back into setup mode, press and hold the B-Fi Status button for about 5 seconds until you hear the voice prompt again.
Connecting B-Fi wirelessly to your internet router.
As device screens seem to constantly change with updates and not all Android menus are identical, the easiest way to get through this setup is to follow the instructions directly in the app and listen to the voice prompts through your music system.
During setup we recommend that your phone, B-Fi, and wireless internet router are within 15 feet of each other. You may need your wifi password if it’s not already saved on your device.
Step 7: Install the previously downloaded Audioengine app onto your iOS or Android device.
Step 8: Open the app and select "OK" if you want the app to access your music library on your device.
Step 9: The app will say "Searching for Audioengine Wireless Hi-Fi System." Select "Add Device".
Step 10: Following the app instructions, select "Settings" to leave the app and go into your device’s wifi settings.
Step 11: Turn on your device’s wifi and select "Audioengine B-Fi" from your wifi list.
Step 12: The audio voice will respond "You are now connected to your speaker. Follow the instructions in the app to finish the setup."
Step 13: Go back into the Audioengine app.
Step 14: B-Fi works on 2.4G, so select 2.4G network from your wifi list and enter your internet router password if prompted to do so.
Step 15: The voice will then say "Connected to your wifi network." Select "Next".
Step 16: Rename B-Fi if you wish, then select the right arrow at the top of the screen.
Step 17: Swipe left 2 times to get to your music or exit the app and go to another player.
Having trouble? Try moving B-Fi and your device closer to your router. Restart your router, device, and B-Fi.

For the full setup guide, download the attached PDF: B-Fi quick start-web
For Android Devices
For Apple DevicesTroubleshootingB-Fi Troubleshooting TipsThe following troubleshooting tips can help diagnose and correct most concerns with the B-Fi. We have attempted to make this list as comprehensive as possible, so some of these may not apply to your issue, but please go through each tip. If the problem persists and your B-Fi is located within the US, please provide us with the following information: serial number, purchase information (when and where), your current shipping address, and the results of each step. If your B-Fi is outside of the US, we are unable to offer product services, but please use the below link to contact the distributor in the country where the B-Fi is located. Since the distributor is who will be assisting you from this point on, they will be able to let you know what options you may have. Be sure to still include your full name, where and when your B-Fi was purchased, the serial number, and your current shipping address when contacting any distributor: https://audioengineusa.com/international-distributors/ If you haven’t already, power cycle your B-Fi by unplugging the power connection, and reconnecting it. 1) Please make sure all of your connections are complete and all of your connector cables are in working order (you will want to swap out some interconnects to test for this). 2) Try playing audio from more than one application on the source device you typically use to connect to your B-Fi (phone, tablet, computer, etc) 3) Check to make sure your source device is running the most up to date version of software available. If an update is available, make sure you restart your device after the update is installed. For Mac users, be sure to check the App store to see if there's a newer version of Mac OS you could be running. 4) Try resetting your B-Fi. Press and hold the status button on the front panel until you hear the voice prompt. 5) Try using a different source device with your B-Fi to see if the issue follows. Try using the analog as well as the digital optical output, to see if you have this issue with both connections.
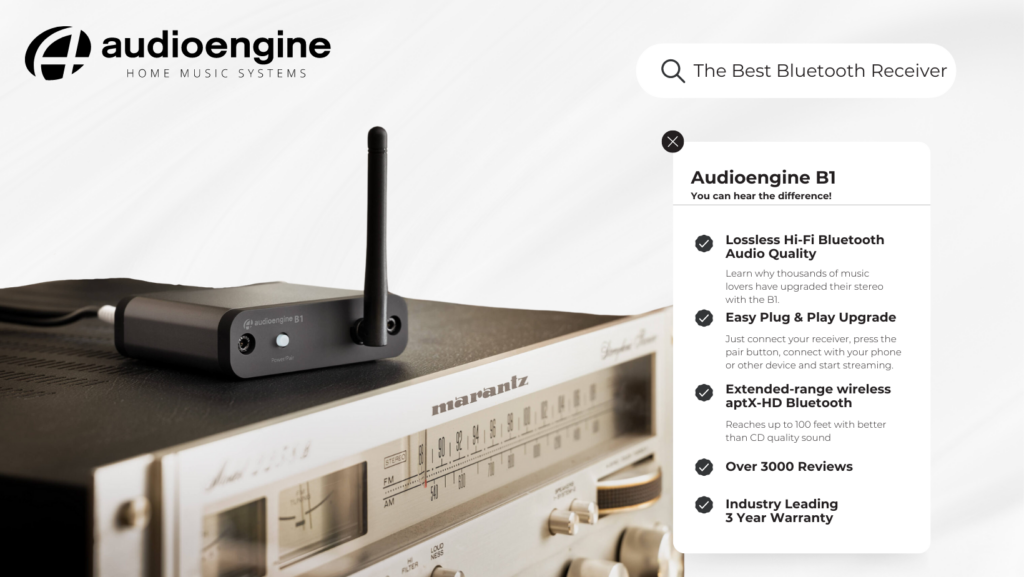
FAQ'sAudioengine B1 and B-Fi Comparison GuideChoosing the right wireless music streamer can significantly enhance your listening experience by offering you the convenience and quality of streaming music wirelessly. In the realm of home audio systems, two standout choices from Audioengine are the B1 Bluetooth Music Receiver and the B-Fi Multiroom Music Streamer. Both devices are designed to stream music wirelessly to your stereo system but cater to different preferences and functionalities. Here's an in-depth look at these options to help you decide which one aligns with your audio streaming needs. B1 Bluetooth Music Receiver: Expanding Horizons with Bluetooth The B1 Bluetooth Music Receiver is designed for simplicity and quality, allowing you to wirelessly stream music from your device directly to your music system. It’s particularly suitable for integrating with both contemporary and vintage stereo systems, offering a touch of modernity without compromising the system's original charm. Noteworthy Aspects:
 B-Fi Multiroom Music Streamer: The Wi-Fi Revolution In contrast, the B-Fi Multiroom Music Streamer takes a leap forward by utilizing your home's Wi-Fi network for music streaming. This approach bypasses traditional Bluetooth streaming, offering a direct and uncompressed audio signal for a pure, high-fidelity sound experience. Key Features:
 Making Your Choice: The Bluetooth vs. Wi-Fi Streaming Quality DebateThe B1, on the other hand, employs Bluetooth connectivity, utilizing high-quality codecs like Qualcomm aptX HD. These codecs are designed to compress and then decompress digital audio files with minimal loss of quality. However, even the most advanced Bluetooth codecs involve some level of digital signal processing (DSP) to recreate the song. While to many listeners the difference may be imperceptible, discerning audiophiles might lean towards the B-Fi for its method of streaming. The B-Fi's reliance on Wi-Fi rather than Bluetooth means the music is streamed without the additional step of DSP, potentially offering a purer, more accurate version of the original recording.
Audioengine A1MR Both the B1 and B-Fi embody Audioengine's commitment to delivering superior sound quality and innovative streaming solutions. By understanding the distinctive features and benefits of each device, you can select the wireless music streamer that best aligns with your lifestyle and audio preferences, ensuring an unparalleled listening experience that brings your music to life exactly as the artist intended. Wi-Fi Input Audio output Output level Sample rates Bit depths Interfaces Processor DAC Signal-to-noise-ratio Distortion Power Power requirements Product dimensions Product weight Shipping weight Shipping box dimensions Environmental Requirements Included accessories Audioengine operates two websites, audioengine.com and audioengineeu.com. If you go to any other site but these, they are not an Audioengine site. For Canada, Mexico and most of Europe and the UK, we only sell through Amazon. There are also a host of authorized retailers and sites across the US, and they can be found here. For international sales, we have distributors that operate independently, and they can be found here. What happens if I buy from an authorized site claiming to be Audioengine? Unfortunately, there is not much we can do. We are taking all the action we can to make sure those sites don't get indexed, but we recommend you work with the provider of the card you used to make payment to get your money back. Step-by-Step Guide
bash Copy code sudo pkill bluetoothd
By following these steps, you should be able to reset your Bluetooth service on your Mac, which can help resolve connectivity issues with your Audioengine devices or any other Bluetooth peripherals. We take great pride in our products, and go through great lengths to ensure consistency and quality. For that reason, this item was randomly selected for an additional step of Quality Assurance. In order to stream Spotify to the Audioengine B-FI or A1-MR, Spotify requires a paid Premium account. This unlocks the Spotify-Connect feature within the app to send the audio to your Audioengine B-FI/A1-MR. A single device using a personal (1 user only) Spotify Premium account cannot play multiple songs simultaneously. However, this would be possible with a family plan and more than 1 device (B-Fi or A1-MR) though. No, there are no firmware updates or special drivers needed unless you own our A1-MR multi-room speakers or our B-Fi multi-room wireless streaming device. If a firmware update is released for the A1-MR or the B-Fi, you will be notified of the update the next time you open the Audioengine Control App. If an update is needed, simply click "update" on the DEVICES page next to the product that needs to have the firmware update applied. The app will handle the rest of the process from there! Standard plug-n-play drivers that are provided by your computer's OS are utilized when using the USB input on our A2+, HD3, and HD4 speaker models. And all of our Bluetooth speakers/products are compatible with any device that supports Bluetooth, and the A2DP profile for streaming stereo audio. This includes most smartphones, tablets, and computers. For computers that don't include Bluetooth support out of the box, you can simply add a USB Bluetooth adapter. The short answer is 'yes'. However, you will need to use an app that gives you the ability to use Airplay while in Windows. Though there are a few options out there, we've found TuneBlade to be one of the more affordable and easy-to-use applications available. TuneBlade is a simple tray utility that lets you stream system-wide audio to the B-Fi from your windows device. There’s a one-time fee of $9.99 to purchase the app, but they have a trial version you can try out for free. To start, make sure your B-Fi is setup on the same network as your Windows device (PC/laptop). Once TuneBlade is installed, start the program. TuneBlade will automatically locate your B-Fi and any other Airplay-ready devices connected to your network. Start playing the audio you wish to stream to your B-Fi(s). While the audio is playing, hit the 'play' button next to the corresponding B-Fi in the TuneBlade app. All audio coming from your computer will now be passed on to the B-Fi. While using TuneBlade, you can send the audio to multiple B-Fi's at once and the audio will automatically sync between B-Fi's without the need to group them in the Control App. Things to keep in mind when using TuneBlade:
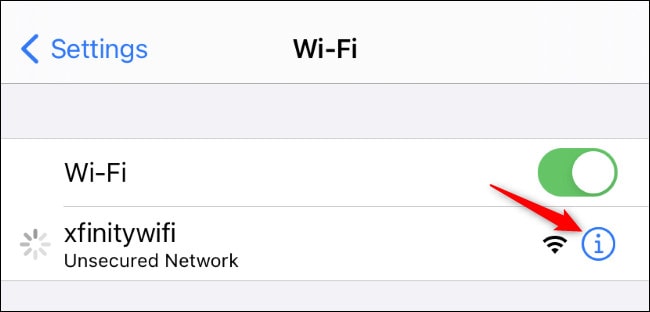
Apple changed the way the iPhone and iPad connect to Wi-Fi networks starting in the iOS 14 and iPadOS 14 updates. This can cause issues when setting up the B-Fi on your network. To resolve this issue you would simply need to disable Private Wi-Fi MAC Addresses on your iPhone. The “Private Address” option is controlled separately for each Wi-Fi network. We don’t recommend disabling it for a network unless you need to do so (or are troubleshooting a problem.)
To find this option, head to Settings > Wi-Fi on your iPhone or iPad. Locate the Wi-Fi network you want to change this option for—it’ll be at the top of the screen if you’re currently connected to it. Tap the “i” icon at the right side of the Wi-Fi network name.
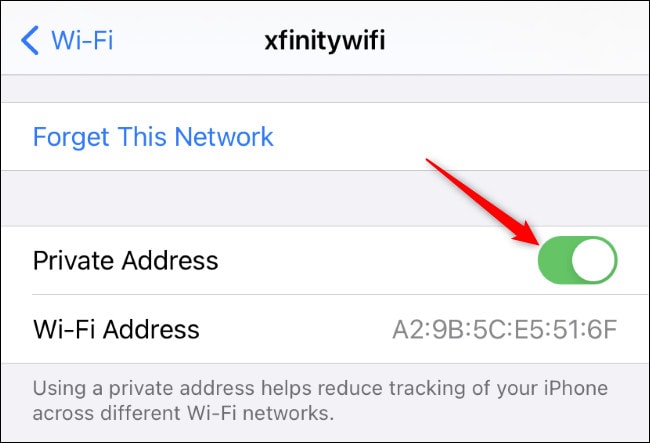
Disable the “Private Address” option by tapping the switch to its right. The “Wi-Fi Address” option here shows you the private MAC address being used on that specific network, just in case you need it—to configure something on a router, for example.
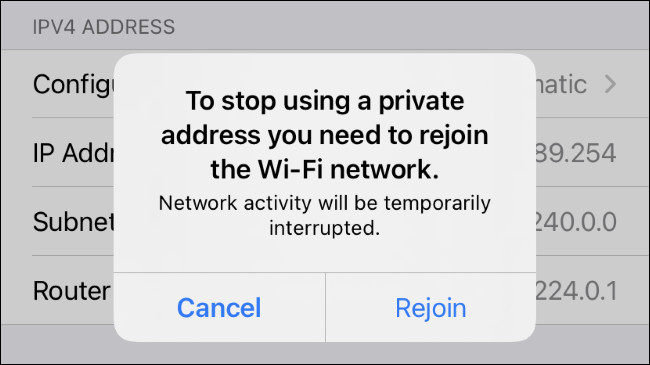
You’ll be prompted to rejoin the network if you’re already connected. Tap “Rejoin” and your iPhone or iPad will rejoin with a static MAC address necessary for the B-Fi to communicate with your device.
You should now be able to go back into the B-Fi Control App to complete the set up process. You'll need to make sure you have gone through the initial set up process for the B-Fi before moving onto the below steps. For iPhone users: 1. On the iPhone, swipe to open Control Center. (the swipe direction is dependent upon the iPhone model you are using)
For Mac users: Option 1:
Option 2:
Once you have each B-Fi set up on your Wi-Fi network: Open the Audioengine control app. Swipe from right to left in the app to the "Device" screen where your B-Fis are listed. Determine which group of B-Fis you want to be your primary, then touch the "+" in the upper right corner. A list of any additional A1-MRs you want to add will appear and you can tap the empty circle to add a check to the bubble, then tap "Done" You can add multiple B-Fis into that primary B-Fi for whole-home playback. You could use these two systems separately, with their respective apps, and separately through Airplay. Sonos speakers are not able to be integrated into a B-Fi system, though. The Audioengine Connect App is only able to recognize B-FI connected audio systems, and the Sonos App will not recognize B-Fi wireless music streamers. So there wouldn’t be a way to group them together. The B-Fi uses the ES9023 DAC. As the B-Fi uses your home wi-fi network, it is lossless and no compression is needed. Sending audio to multiple B-Fi units at once will not impact the audio quality. Any audio source can be used for multiroom playback through your B-Fi(s) when using AirPlay, or when streaming audio via DLNA / UPnP, or using the streaming services integrated into the Audioengine Control App. The B-Fi(s) need only first be configured into groups using the Audioengine Control App. For music streamed through Audioengine Control App, or from streaming applications built into the Audioengine Control App, the B-Fi streams music directly over your WiFi network. The stream will continue whether your device is taken out of range or turned off altogether. Airplay, generally speaking makes a connection between your source device and the B-Fi, through your network. If your device goes out of range of the network, or the application on your source that is playing audio is closed, playback will stop. The B-Fi doesn’t include a YouTube Music integration into the Audioengine Control App, but YouTube Music will work via Airplay on an Apple Device. So you’d be able to stream YouTube Music to the B-Fi from your iPhone, iPad, or Mac computer, no problem. Both Audioengine Bluetooth and WiFi-based solutions are capable of delivering very high quality audio! Bluetooth is an extremely convenient way to quickly pair to a speaker for easy wireless playback. WiFi solutions are great for multi-room setups with custom groupings with different music or simultaneous playback to all which can be easily controlled with the B-Fi app. The B-Fi doesn’t include any MQA specific hardware, but you can still enjoy the benefits of MQA through software decoding with services like TIDAL, where you’ll have access to up to 16-bit 44.1kHz high resolution audio. Gapless playback works great when streaming to the B-Fi as long as the music app you are using supports gapless playback as well, such as Spotify. You would not need to adjust anything with the B-Fi or within the Audioengine B-Fi app. Windows 10 supports sharing the media on your computer via DLNA. To set this up, you’ll need to:
From here you can play audio stored on your computer to any B-Fi(s) on your network. Just keep in mind that your computer will need to be powered on. Qobuz works great with the B-Fi for lossless CD quality streaming! Once you get your B-Fi setup on your network using the Audioengine app, you will be able to send your Qobuz music to the B-Fi through the Qobuz app on your MacBook Pro, the Qobuz app on your devices, or directly through the Audioengine Control app! Qobuz and other lossless capable streaming services are played back at CD quality, with no compression. If you have grouped the speakers for a multi-room setup in the Audioengine app, only the B-Fi that you grouped the speakers into will show as the available destination. If you wish to send to your other speakers independently, ungroup the B-Fi in the app by pressing and holding on the speaker in the grouping and dragging down and away from the group. Press and hold the status button on the front panel until the LED begins flashing (about 4 seconds), and you hear a voice prompt letting you know that the B-Fi has entered setup mode. If you don't hear the voice prompt, double check your audio systems volume, and that the B-Fi is connected to an active input. Open the Audioengine Control app on your smartphone or tablet, and follow the instructions to complete setup. If you have other B-Fi units that are already configured, you will need to press the + in the top right corner of the screen to continue setup. Yes. Yes. You must be connected to your network for your music to play. Try playing music directly on your phone, tablet or from your local library using the same network to check your internet connection. If your internet connection is OK:
One of the great benefits to the B-Fi is that you’re no longer stuck using one product app. Any music player will work for iOS and MacOS via Airplay, as well as DLNA or UPnP streaming options for Android and Windows. We considered Airplay 2, and will continue to keep an eye on it for future products or updates. At present though, the B-Fi includes support for only Airplay. While Airplay 2 allows grouping of Airplay 2 devices in the Apple Home app, to allow streaming audio to multiple rooms at once, we've already built out advanced multi-room grouping features through the Audioengine Connect App. And in our implementation, these features extend not only to Airplay on iOS and MacOS, but can even be used for non-Apple devices which don't support Airplay or Airplay 2. The B-Fi is a 2.4GHz device but most networks are dual-band, so select 2.4GHz during B-Fi setup. Any Audioengine powered speaker systems that have line-level (RCA or 3.5mm) input connection or digital optical input will work with B-Fi. Yes, anybody connected to the same network. Yes. You can play music from your library, a mobile device storage device, and portable hard disks and NAS. The B-Fi supports lossless playback of CD quality audio, with zero compression. While you can play higher than CD quality audio to the B-Fi through DLNA, UPnP, or high res streaming apps like TIDAL and Qobuz, all audio is transmitted at 16-bit 44.1kHz. Yes. If your hotspot is listed as a choice in Wi-Fi networks, you can use it as an access point. After setup you can stream your music anywhere there is a reliable wireless internet signal. The Audioengine Control app supports a maximum of 12 rooms, however for most homes we recommend 8. Yes, while streaming via Airplay. Both are capable of high-resolution and high-definition audio and provide the highest quality sound for wireless streaming.
Product Videos |