Simplified Setup: Audioengine A1MR Studio Monitors
The Audioengine A1MR Studio Monitors offer two setup options depending on your needs:
- Wired Setup (2 minutes): For immediate use without streaming features, simply connect via the AUX/3.5mm jack and start podcasting, listening, or mixing audio right away—no app required. Important Note: When turning on the speaker, you'll hear one voice prompt; this will only happen once and won’t repeat until the speaker is turned off and back on.
OR
- Wifi Setup (8-15 minutes): To access multiroom and streaming features, download and follow the steps in the Audioengine app.
The Control App - Watch the videos below to see options you will get based on your type of smartphone. The Control app is used to connect the A1MR speakers to your home network. Plug in and turn on your speakers and follow the instructions below.
|
|
Step 1: Turn on power via the rear panel volume/power knob and set the volume to around 50% so you can hear the audio prompts during setup.
Step 2: The A1MR Status button will blink rapidly for 15 seconds, then a piano tone will play.
Step 3: The A1MR Status button will now blink more slowly and a voice will say: "Entering setup mode. Follow the instructions in the app to finish the setup." If no piano tone or voice is heard after 15 seconds, increase the A1MR volume level.
The A1MR will stay in setup mode (indicated by the slow-blinking Status button) for 5 minutes before timing out. To re-enter setup mode, press and hold the A1MR Status button for about 5 seconds until you hear the voice prompt again.
To go back into setup mode, press and hold the A1-MR Status button for about 5 seconds until you hear the voice prompt again.
Connecting A1-MR wirelessly to your internet router.
As device screens seem to constantly change with updates and not all Android menus are identical, the easiest way to get through this setup is to follow the instructions directly in the app and listen to the voice prompts.
During setup we recommend that your phone, A1-MR, and wireless internet router are within 15 feet of each other. You may need your wifi password if it’s not already saved on your device.
Step 4: Open the previously downloaded Audioengine app onto your iOS or Android device and select "OK" if you want the app to access your music library on your device.
Step 5: The app will say "Searching for Audioengine Wireless Hi-Fi System." Select "Add Device".
Step 6: Following the app instructions, select "Settings" to leave the app and go into your device’s wifi settings.
Step 7: Turn on your device’s wifi and select "Audioengine A1-MW" from your wifi list.
Step 8: The audio voice will respond "You are now connected to your speaker. Follow the instructions in the app to finish the setup."
Step 9: Go back into the Audioengine app.
Step 10: A1-MR works on 2.4G, so select 2.4G network from your wifi list and enter your internet router password if prompted to do so.
Step 11: The voice will then say "Connected to your wifi network." Select "Next".
Step 12: Rename A1-MR if you wish, then select the right arrow at the top of the screen.
Step 13: Swipe left 2 times to get to your music or exit the app and go to another player.
Having trouble? Try moving A1-MR and your device closer to your router. Restart your router, device, and A1-MR.
Step 1: Connect the speaker wire from the HD5 left (powered) speaker to the right (passive) speaker.
Step 2: Connect the wireless antenna to the HD5 rear panel.
Step 3: Connect the power cable to the HD5 rear panel and plug the other end into an AC power outlet.
Wireless Connection
Step 4: Turn on the HD5 power switch located on the rear panel. HD5 will automatically go into Bluetooth "pair mode" and the Pair button on the HD5 rear panel should start flashing.
Step 5: On your device (phone, tablet, laptop, etc), turn on Bluetooth and go to Bluetooth preferences.
Step 6: Select "Audioengine HD5" to pair and connect. The Pair indicator on the HD5 rear panel should be solid.
Play your music and adjust volume levels on HD5 and your device.
Step 7: To add additional devices put HD5 back into pair mode by disconnecting HD5 from your device or by pressing and holding the Pair button on the HD5 rear panel until the pair indicator starts flashing.
HD5 can wirelessly connect to only one device at a time, however it will remember up to six different devices.
Wired Connection
Step 8: Connect one of the included audio cables to your music player (phone, tablet, computer, TV, etc) and the other end to an input on the HD5 rear panel.
Step 9: Play your music and adjust the volume on the speakers and your device to the desired listening levels.
The following diagrams show the most common configurations for connecting your DAC3 from a computer' USB port to wired headphones or any music system.
Step 1: Connect the DAC3 to your phone, tablet or computer's USB-C port using the included cables. (Lightning to USB-C for iOS devices and USB-C for MacOS, Android and Windows).
For PC, the DAC3 should be recognized automatically.
For Mac, under System Preferences/Sound, select "Audioengine DAC3" as the sound output.
Step 2: Connect the mini-jack output of your DAC3 to wired headphones, or any audio input of your powered speakers, stereo system, etc.
Note that the audio cables to connect your DAC3 to a stereo system are not included with the DAC3.
Step 3: Adjust the volume on your device and DAC3 via the side panel control to a medium level and start playing music.
For the full setup guide, download the attached PDF:
DAC3 Quickstart Guide
For Android Devices
For Apple Devices
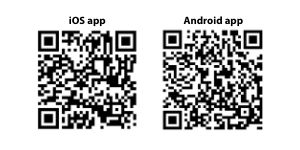
Step 1: Download the free Audioengine app from the Apple App Store for iOS or from Google Play for Android. A1-MR setup as well as multiroom and stereo configurations are done via the Audioengine app from an iOS or Android device.

Step 2: Connect the included speaker wire from the A1-MR left (powered) speaker to the right (passive) speaker, observing proper polarity to each speaker connector.
Step 3: Connect the Ac power cord to the A1-MR left speaker rear panel and plug the other end of the cable into a functioning power outlet.
Step 4: Turn on power via the rear panel volume/power knob and set the volume to around 50% so you can hear the audio prompts during setup.
Step 5: The A1-MR Status button will blink rapidly for 15 seconds, then a piano tone will play.
Step 6: The A1-MR Status button will now blink more slowly and a voice will say: "Entering setup mode. Follow the instructions in the app to finish the setup."If no piano tone or voice is heard after 15 seconds, increase A1-MR volume level.
A1-MR will remain in setup mode (slow-blinking Status button) for 5 minutes before timing-out.
To go back into setup mode, press and hold the A1-MR Status button for about 5 seconds until you hear the voice prompt again.
Connecting A1-MR wirelessly to your internet router.
As device screens seem to constantly change with updates and not all Android menus are identical, the easiest way to get through this setup is to follow the instructions directly in the app and listen to the voice prompts.
During setup we recommend that your phone, A1-MR, and wireless internet router are within 15 feet of each other. You may need your wifi password if it’s not already saved on your device.
Step 7: Open the previously downloaded Audioengine app onto your iOS or Android device and select "OK" if you want the app to access your music library on your device.
Step 8: The app will say "Searching for Audioengine Wireless Hi-Fi System." Select "Add Device".
Step 9: Following the app instructions, select "Settings" to leave the app and go into your device’s wifi settings.
Step 10: Turn on your device’s wifi and select "Audioengine A1-MW" from your wifi list.
Step 11: The audio voice will respond "You are now connected to your speaker. Follow the instructions in the app to finish the setup."
Step 12: Go back into the Audioengine app.
Step 13: A1-MR works on 2.4G, so select 2.4G network from your wifi list and enter your internet router password if prompted to do so.
Step 14: The voice will then say "Connected to your wifi network." Select "Next".
Step 15: Rename A1-MR if you wish, then select the right arrow at the top of the screen.
Step 16: Swipe left 2 times to get to your music or exit the app and go to another player.
Having trouble? Try moving A1-MR and your device closer to your router. Restart your router, device, and A1-MR.
Step 1: Connect the speaker wire from the HD4 left (powered) speaker to the right (passive) speaker.
Step 2: Attach the wireless antenna to the HD4 rear panel.
Step 3: Insert the power cable into the HD4 rear panel and plug the other end into an AC power outlet.
Wireless Connection
Step 4: Turn on the HD4 power switch located on the rear panel. HD4 will automatically go into Bluetooth "pair mode" and the Pair button on the HD4 rear panel should start flashing.
Step 5: On your device (phone, tablet, laptop, etc), turn on Bluetooth and go to Bluetooth preferences.
Step 6: Select "Audioengine HD4" to pair and connect. The Pair indicator on the HD4 rear panel should be solid. Play your music and adjust volume levels on HD4 and your device.
Step 7: To add additional devices put HD4 back into pair mode by disconnecting HD4 from your device or by pressing and holding the Pair button on the HD4 front panel until the pair indicator starts flashing. HD4 can wirelessly connect to only one device at a time, however it will remember up to six different devices.
Wired Connection
Step 8: Connect one of the included audio cables to your music player (phone, tablet, computer, TV, etc) and the other end to an input on the HD4 rear panel.
Step 9: Play your music and adjust the volume on the speakers and your device to the desired listening levels.
For the full setup guide, download the attached PDF:
HD4 Quickstart Guide
Step 1: Connect the included speaker wire from the A1 left (powered) speaker to the right (passive) speaker, observing proper polarity to each speaker connector.
Step 2: Verify that the volume/power knob on the rear panel of the left speaker is in the OFF position by rotating the knob until it clicks off..
Step 3: Connect the cable from the external power supply to the A1 left speaker rear panel.
Step 4: Connect the Ac power cord to the A1 left speaker rear panel and plug the other end of the cable into a functioning power outlet.
Wireless Connection
Step 1: Turn power on via the rear panel volume/power knob.
A1 will automatically go into Bluetooth "pair mode" and the Pair button on the rear panel will start flashing.
Step 2:: On your device (phone, tablet, computer, etc), turn on Bluetooth and go to Bluetooth preferences.
Step 3: Select "Audioengine ONE" to pair and connect. The Pair indicator on the A1 rear panel should be solid.
Step 4: Play your music and adjust volume levels on A1 and your device.
Step 5: To add additional devices put A1 back into pair mode by disconnecting A1 from your device or by pressing and holding the Pair button on the A1 rear panel until the pair indicator starts flashing. Repeat steps 2 & 3 to connect another device.
A1 can wirelessly connect to only one device at a time, however it will pair with and remember up to 6 different devices.
Wired Connection
Step 1: Connect an audio cable between your device and the input on the A1 rear panel.
Step 2: Play your music and adjust the volume on the speakers and your device to the desired listening levels.
For the full setup guide, download the attached PDF:
Step 1: Download the free Audioengine app from the Apple App Store for iOS or from Google Play for Android. This is what you need to set up and configure your B-Fi. No need to install or open this app yet as we first need to connect B-Fi to your music system.
Step 2: Connecting B-Fi to your music system
Step 3: Connect the included RCA audio cable (or TOSLINK digital optical cable) between B-Fi and your music system or powered speakers.
Step 4: Connect the included power cable between the power supply and B-Fi, then plug the power supply into a functioning power outlet.
Step 5: Turn on your music system and set the volume level so you can hear the voice and audio prompts during setup.
Step 6: The B-Fi Status button will blink rapidly for 15 seconds, then a piano tone will play through your music system. The B-Fi Status button will now blink more slowly and a voice will say: "Entering setup mode. Follow the instructions in the app to finish the setup."
If no piano tone or voice is heard after 15 seconds, check your music system volume level.
B-Fi will remain in setup mode (slow-blinking Status button) for 5 minutes before timing-out.
To go back into setup mode, press and hold the B-Fi Status button for about 5 seconds until you hear the voice prompt again.
Connecting B-Fi wirelessly to your internet router.
As device screens seem to constantly change with updates and not all Android menus are identical, the easiest way to get through this setup is to follow the instructions directly in the app and listen to the voice prompts through your music system.
During setup we recommend that your phone, B-Fi, and wireless internet router are within 15 feet of each other. You may need your wifi password if it’s not already saved on your device.
Step 7: Install the previously downloaded Audioengine app onto your iOS or Android device.
Step 8: Open the app and select "OK" if you want the app to access your music library on your device.
Step 9: The app will say "Searching for Audioengine Wireless Hi-Fi System." Select "Add Device".
Step 10: Following the app instructions, select "Settings" to leave the app and go into your device’s wifi settings.
Step 11: Turn on your device’s wifi and select "Audioengine B-Fi" from your wifi list.
Step 12: The audio voice will respond "You are now connected to your speaker. Follow the instructions in the app to finish the setup."
Step 13: Go back into the Audioengine app.
Step 14: B-Fi works on 2.4G, so select 2.4G network from your wifi list and enter your internet router password if prompted to do so.
Step 15: The voice will then say "Connected to your wifi network." Select "Next".
Step 16: Rename B-Fi if you wish, then select the right arrow at the top of the screen.
Step 17: Swipe left 2 times to get to your music or exit the app and go to another player.
Having trouble? Try moving B-Fi and your device closer to your router. Restart your router, device, and B-Fi.
For the full setup guide, download the attached PDF: B-Fi quick start-web
For Android Devices
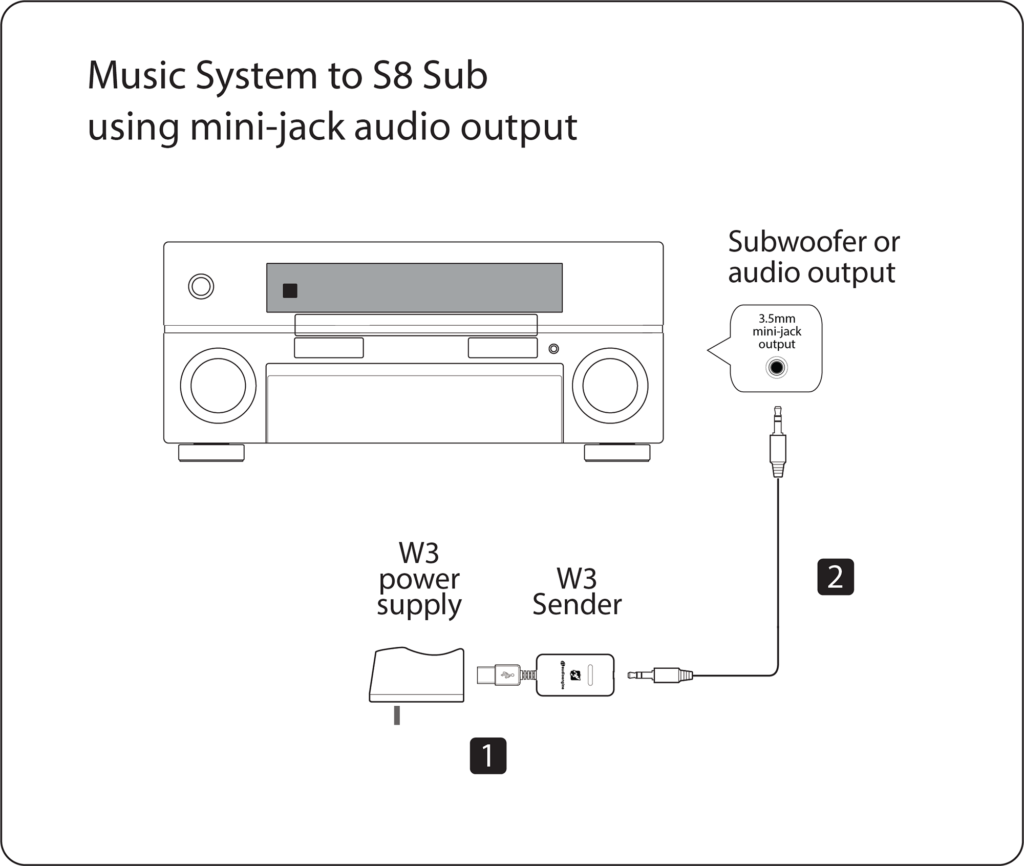
For Apple DevicesThe W3 Wireless Audio Adapter, which is part of the S8 Wireless Subwoofer system, will allow you to send music wirelessly from any music system with an audio output to the S8 Subwoofer. Here are the two most common setups to make your S8 subwoofer wireless using the included Audioengine W3 wireless adapter kit.
Music System to S8 Sub using mini-jack audio output 1) Connect the W3 power supply to the W3 Sender and plug the W3 power supply into a functioning AC power outlet. 2)Connect a mini-jack audio cable from the W3 Wireless Sender to your music system audio out or subwoofer output.
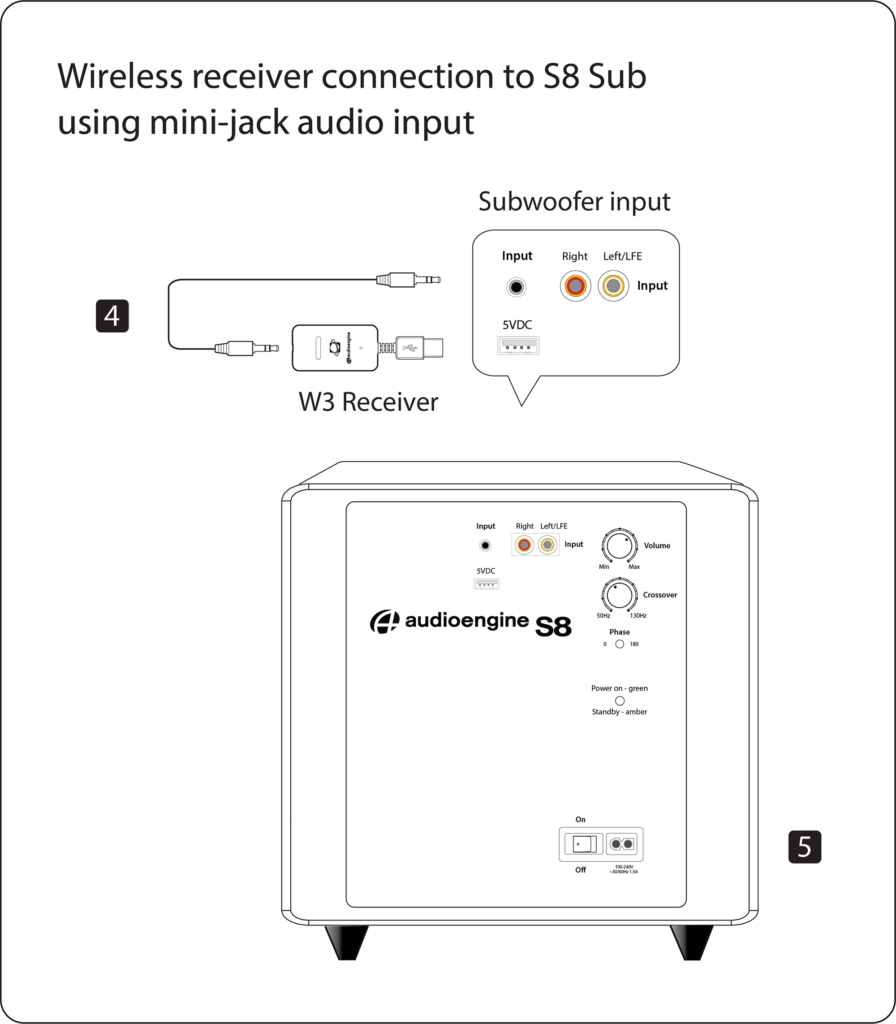
Wireless receiver connection to S8 Sub using mini-jack audio input 3) Connect the included mini-jack cable from the W3 Receiver to the audio input on the rear panel of the S8 subwoofer. 4) Power on the S8 subwoofer. The status indicators on the W3 Sender and Receiver will both blink briefly and will then go solid, indicating they are paired and ready to play your music.
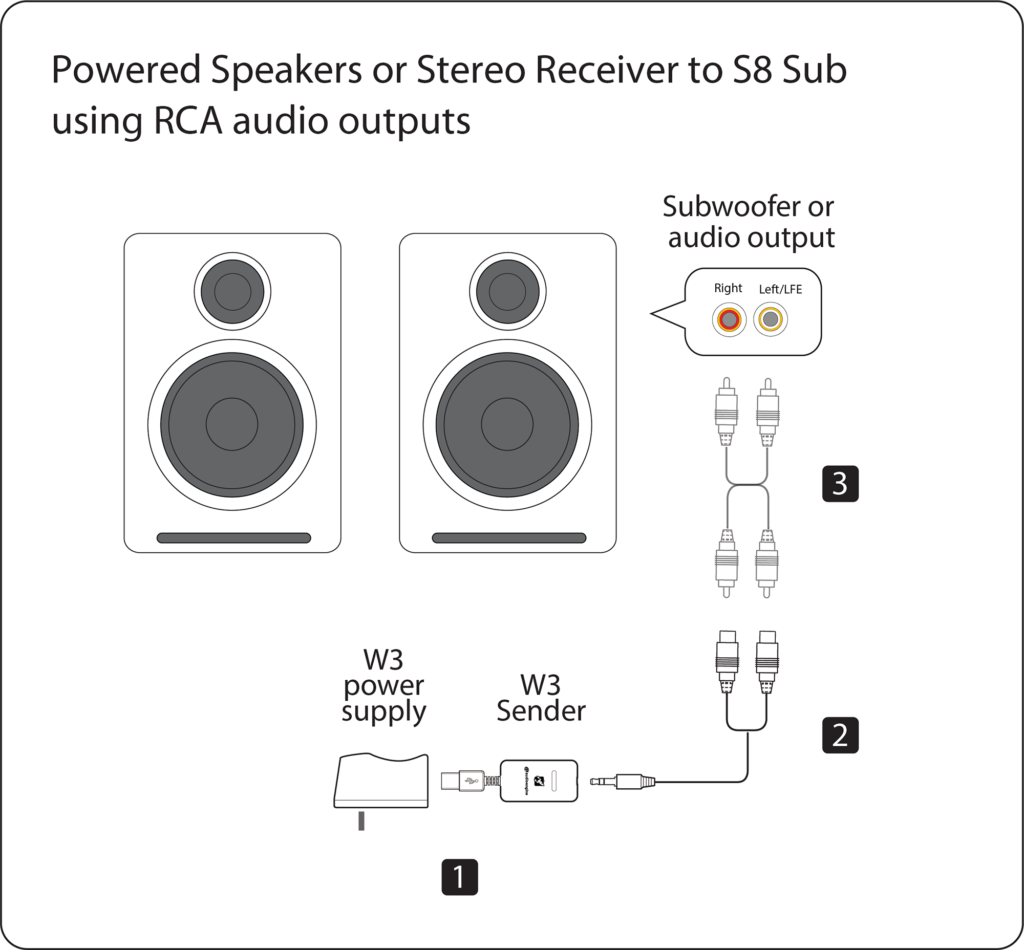
Powered Speakers or Stereo Receiver to S8 Sub using RCA audio outputs 1) Connect the W3 power supply to the W3 Sender and plug the W3 power supply into a functioning AC power outlet. 2) If your powered speakers or AV receiver has RCA-style audio outputs or sub outputs, connect the included RCA adapter “Y” cable to the W3 Sender. 3) Connect an RCA cable (included with your powered speakers or AV receiver) between the RCA “Y” adapter cable and your music source subwoofer out.
Wireless receiver connection to S8 Sub using mini-jack audio input 4) Connect the included mini-jack cable from the W3 Receiver to the audio input on the rear panel of the S8 subwoofer. 5) Power on the S8 subwoofer. The status indicators on the W3 Sender and Receiver will both blink briefly and will then go solid, indicating they are paired and ready to play your music.
For instructions on setting up the S8 Subwoofer, refer to the S8 Quickstart Guide. Power ON/OFF Wireless Connection To put the 512 back into pairing mode and disconnect from a device press and hold the Bluetooth button on th 512 top panel until the indicator begins flashing. Aux Input Volume Play/Pause Battery Charging With a fully charged battery, you'll get up to 12 hours of use at typical listening levels.
Step 1: Connect the included speaker wire from the A2+ left (powered) speaker to the right (passive) speaker, observing proper polarity to each speaker connector. 1) Use your thumb and finger to unscrew the binding post connectors on the back of each speaker. 2) Insert each speaker wire into the holes on the side of binding post connectors, making sure to connect the positive (+) terminal on the left speaker to the positive (+) terminal on the right speaker. 3) Retighten the binding posts with your fingers. 4) Verify that only the exposed portion of the speaker wire is secured firmly in each connector. 5) Make sure that none of the speaker wire strands have come in contact with an adjoining terminal. Step 2: Verify that the volume/power knob on the rear panel of the left speaker is in the OFF position by rotating the knob until it clicks off.. Step 3: Connect the cable from the external power supply to the A2+ left speaker rear panel. Step 4: Connect the Ac power cord to the other end of the power supply, and plug the cord into a functioning power outlet. A light on the power supply should be illuminated. Wireless Connection Step 1: Turn power on via the rear panel volume/power knob. Step 2:: On your device (phone, tablet, computer, etc), turn on Bluetooth and go to Bluetooth preferences. Step 3: Select "Audioengine A2+" to pair and connect. The Pair indicator on the A2+ rear panel should be solid. Step 4: Play your music and adjust volume levels on A2+ Wireless and your device. Step 5: To add additional devices put A2+ back into pair mode by disconnecting A2+ from your device or by pressing and holding the Pair button on the A2+ Wireless rear panel until the pair indicator starts flashing. Repeat steps 2-4 to connect another device. A2+ can wirelessly connect to only one device at a time, however it will pair with and remember up to 6 different devices. Wired Connection Step 1: Connect an audio cable between your device and one of the inputs on the A2+ rear panel. Step 2: Play your music and adjust the volume on the speakers and your device to the desired listening levels. USB Audio Connection Step 1: Connect the included USB cable between your computer and the USB input on the rear panel of the left powered speaker. Step 2: If using Windows, the A2+ should be recognized automatically. For MacOS, under System Preferences/Sound/Output, select "Audioengine A2+". For the full setup guide, download the attached PDF: Step 1: Connect the speaker wire from the left (powered) speaker to the right (passive) speaker. Step 2: Connect the power cable to the A5+ Wireless rear panel and plug the other end into an AC power outlet. Step 3: Connect the wireless antenna to the A5+ Wireless rear panel. Wireless Connection Step 1: Turn on the A5+ Wireless power switch located on the rear panel. A5+ Wireless will automatically go into "pair mode" and the Pair button on the rear panel should be flashing. Step 2: On your device, turn on Bluetooth and go to Bluetooth preferences. Select "Audioengine A5+" to pair and connect. The Pair indicator on the A5+ Wireless rear panel should be solid. Step 3: Play your music and adjust volume levels on A5+ Wireless and your device. Step 4: Repeat Steps 2 and 3 to add additional devices. A5+ Wrireless can connet only to one device at a time but will remember up to six devices. To disconnect A5+ Wireless from a paired device and put the speakers back into pair mode, press and hold the Pair button on the A5+ Wireless rear panel until the pair indicator starts flashing. Wired Connection Step 1: Connect one of the included audio cables to your music player (phone, tablet, computer, TV, etc) and the other end to an input on the A5+ Wireless rear panel. Step 2: Play your music and adjust the volume on the speakers and your device to the desired listening levels. For the full setup guide, download the attached PDF: A5+ Wireless Setup VideoStep 1: Connect the speaker wire from the HD3 left (powered) speaker to the right (passive) speaker. Step 2: Attach the wireless antenna to the HD3 rear panel. Step 3: Insert the power cable into the HD3 rear panel and plug the other end into an AC power outlet. Wireless Connection Step 4: Turn on the HD3 power switch located on the rear panel. HD3 will automatically go into Bluetooth "pair mode" and the Pair button on the HD3 rear panel should start flashing. Step 5: On your device (phone, tablet, laptop, etc), turn on Bluetooth and go to Bluetooth preferences. Step 6: Select "Audioengine HD3" to pair and connect. The Pair indicator on the HD3 rear panel should be solid. Play your music and adjust volume levels on HD3 and your device. Step 7: To add additional devices put HD3 back into pair mode by disconnecting HD3 from your device or by pressing and holding the Pair button on the HD3 front panel until the pair indicator starts flashing. HD3 can wirelessly connect to only one device at a time, however it will remember up to six different devices. Wired Connection Step 8: Connect one of the included audio cables to your music player (phone, tablet, computer, TV, etc) and the other end to an input on the HD3 rear panel. Step 9: Play your music and adjust the volume on the speakers and your device to the desired listening levels. For the full setup guide, download the attached PDF: HD3 Setup Video |


