The following troubleshooting tips can help diagnose and correct most concerns with the D1. We have attempted to make this list as comprehensive as possible. So, even though some of these may not apply to your issue, please still go through each one.
- Restart your device and make sure the OS and all related apps are up-to-date.
- Make sure the USB cable and audio cable connections to and from the D1P are complete, and verify that these cables are in working order by unplugging the cables and then reconnecting. Try using the included USB cable if you are not already. If you’re using an Apple source with Lightning port, make sure the adapter cable is a certified Apple cable.
- Remove all other USB devices temporarily from your computer to see how this affects the D1P playback. Audio over USB and bus powering a device can both be somewhat demanding. USB ports can share a bus internally and can also share their bus with devices internally as well. Because of this, some ports may not perform as well as others, so be sure to try each USB port one at a time.
- If using Windows, uninstall the USB driver from your computer. Then disconnect the USB cable to remove the D1Pfrom your computer and plug it back in to allow the driver to reinstall automatically. You can find complete instructions from Microsoft on how to reinstall a plug-and-play device under Windows here.
- If you are using an intel-based Mac, try a NVRAM/PRAM reset. This resets the system configurations for some audio and video related things and can many times help clear up problems related to audio. See Apple’s support page for information on how to do this. Also, be sure to check the App store to see if there's a newer version of Mac OS you could be running.
- Try music with different bit depths and sample rates. On a Mac these settings are under Applications --> Utilities --> Audio MIDI Setup. Try using both 16-bit as well as 24-bit settings.
- Experiment with using a different media player (iTunes, Songbird, Win Amp, Cog, etc.) and different audio file types (MP3, ALAC, FLAC, etc.). And if your media library is located on an external drive or network attached storage (NAS), try playing audio files on your internal local hard-drive.
- When using the optical input on your D1P, be sure that your source device (computer, TV, CD/DVD player, etc.) is set to PCM Stereo output and not Dolby Digital or DTS.
- If you are using a wireless device with D1P, temporarily remove the wireless adapter from the setup and connect the D1P directly to the audio source.
- If possible, try your D1P with a different device to see if something is causing an issue in the current setup.
The following troubleshooting tips can help diagnose and correct most concerns with the HD5. We have attempted to make this list as comprehensive as possible, so some of these may not apply to your issue, but please go through each tip.
If the power indicator on the HD5 front panel is not illuminated, then try these tips:
- Verify that the AC power cord is connected to the speaker rear panel and to a working AC power outlet.
- Check that the speaker’s power switch is in the ON position.
- Check that the rear panel voltage selector matches the operating voltage in your country or region.
- If there is still no power, check the fuse in the rear panel. If the fuse is blown and needs to be replaced it is important to replace with same fuse type and value.
If the front panel indicator light is on but you are experiencing an audio-related or other issue, try these tips:
- Power-cycle the speakers by switching them off and back on using the power switch on the rear panel.
- Be sure the speakers are not in MUTE or SLEEP mode (if so, the front panel indicator light will be flashing).
- Check that the cables from your audio sources to the speaker are properly connected. Confirm by unplugging the audio cables and then reconnecting. Try using as many different inputs and input sources as possible to see if the problem follows.
- Check speaker wire connections from the left (powered) speaker to the right (passive) speaker. Confirm by removing the speaker wire from on each speaker and reconnecting. Also check speaker wire polarity by verifying that the wires are going to same terminals on both speakers.
- Verify that your audio input source components or devices are all powered on and the volume levels are turned up.
- If using a computer, verify that the audio output balance setting is centered for the OS and all apps.
- Make sure the speakers are not too close to a wall or other obstruction, which could limit bass output.
- Decrease the volume level of the audio input source and increase the volume of the speakers.
- If you are using a wireless adapter, preamp, or external DAC with these speakers, remove these (temporarily) and connect the audio source directly to the speakers.
- If your input source has its own EQ or other sound settings, make sure they are all (temporarily) turned off.
- Also try moving the speakers to a different location to see if something is causing interference in the current location. Something as simple as a wireless internet router, cordless or mobile phone, or halogen lamp near the speakers can all cause interference.
HD5 troubleshooting tips - Bluetooth
- Verify that the HD5 is connected to power and the rear panel power switch is turned on. If you haven’t already, power-cycle your speakers by switching them off and back on.
- If your HD5 is already connected to a device via Bluetooth, the Bluetooth Pair light on the rear panel of the left speaker will be on and solid (note that if your HD5 has been idle and not connected to a device for more than 2 minutes, the Pair light will automatically turn off). Tap the Pair button and it should begin blinking (or pair to your HD5 using your source device, and the LED will go from off to on and solid).
- Try playing audio from more than one application on your phone/tablet, or computer.
- Check to make sure your source device (computer, tablet, phone, etc) is running the most up-to-date version of software available. For Mac OS users, be sure to check the App store to see if there's a newer version of Mac OS you could be running.
- Try disconnecting from and forgetting the HD5 through your device’s Bluetooth settings, and re-pairing to the HD5.
- Try using a different source device with your HD5 to see if the issue follows. Also be sure to test your HD5 using the analog input as well.
- If possible, try your HD5 in a different location to see if something is causing an issue in the current setup. Something as simple as a wireless internet router, cordless or mobile phone, or halogen lamp near the speakers may be causing interference in your setup.
HD5 troubleshooting tips - remote control
Remote control is not working or remote range is reduced.
- Make sure nothing is blocking the remote control receiver, which is in the left powered speaker.
- Check the remote battery to be sure it is installed correctly.
- Replace the battery with another CR2025 battery
The following troubleshooting tips can help diagnose and correct most concerns with the DAC3. We have attempted to make this list as comprehensive as possible. So, even though some of these may not apply to your issue, please still go through each one.
- Restart your phone, tablet or computer and make sure your computer’s OS and all related apps are up-to-date.
- Verify that the audio cable (or headphone) connection out of the DAC3 is complete and in working order. You can do this by unplugging the cable and then reconnecting.
- If using a computer, disconnect all other USB devices temporarily to see how this affects DAC3 playback. Audio over USB and bus powering a device can both be somewhat demanding. USB ports can share a bus internally and can also share their bus with devices internally as well. Because of this, some ports may not perform as well as others; so be sure to try each USB port one at a time.
- If using Windows, uninstall the USB driver from your computer. Then disconnect D3 from your computer and plug it back in to allow the driver to re-install automatically. You can find complete instructions from Microsoft on how to reinstall a plug-and-play device under Windows here.
- If you are using a Mac, try a NVRAM/PRAM reset. This resets the system configurations for some audio and video related items and can many times help clear up problems related to audio. See Apple’s support page for information on how to do this. Also, be sure to check the App store to see if there's a newer version of Mac OS you could be running.
- Try music with different bit depths and sample rates. On a Mac these settings are under Applications --> Utilities --> Audio MIDI Setup. Try using both 16-bit and 24-bit, as well as 32-bit settings.
- Experiment with using a different media player (iTunes, Songbird, WinAmp, Cog, etc) and different audio file types (MP3, ALAC, FLAC, etc). And if your media library is located on an external drive or network attached storage (NAS), try playing audio files on your internal local hard-drive.
- If possible, try your DAC3 with a different device to see if something is causing an issue in the current setup.
The threaded inserts found in the P4's will accommodate a 1/4" -20 threaded bolt. Be careful to not overtighten the bolt as you could damage the cabinet by doing so.
Standard HD4 troubleshooting tips
The following troubleshooting tips can help diagnose and correct most concerns with the HD4. We have attempted to make this list as comprehensive as possible. Although some of these tips may not apply to your issue, please still go through each one.
-
- Verify that the volume/power control on the rear panel is not turned all the way down or powered off (we recommend setting the volume to at least the 10 o’clock position).
- Double check that your audio source is on and that its volume is not set to the minimum level.
- Check the speaker wire connections from the left (powered) speaker to the right (passive) speaker. Confirm this by removing the speaker wire from each speaker and then reconnecting them. Also, check the speaker wire polarity by verifying that the wires are going to the same terminals on both speakers (black to black, red to red, etc.).
- Make sure that the cables from your audio sources to the speakers are properly connected. Confirm this by unplugging the audio cables and then reconnecting them.
- Decrease the volume of the input audio source and increase the volume of the speakers.
- Try using different audio source devices to see if the problem follows.
- Try swapping your left and right speaker via the RCA left and right inputs to see if the issue remains in the same channel or follows the speaker.
- When using a computer with your HD4 speakers, make sure that the level is turned up on your various volume controls (media players, internet radio, master control, device volume, etc.) and that the balance control is centered.
- If your input source has its own EQ, then please make sure the low end is at a moderate level, as having too much bass can cause distortion.
- If you are using a wireless adapter, preamp, or external DAC with these speakers, then remove them temporarily and connect the audio input source directly to the speakers.
- Move your speakers to a different location to see if something is causing interference in the current setup. Something as simple as a wireless internet router, mobile phone or halogen lamp near the speakers can cause interference.
HD4 troubleshooting tips - Internal USB digital-to-analog converter
Try these tips if your computer does not recognize the speaker through your computer’s USB input. Additionally, try these tips if the sound through the USB input isn’t functioning correctly.
If you are using a Windows computer, uninstall the USB driver from your computer. Then, disconnect the USB cable to remove the HD4 from your computer and plug it back in to allow the USB driver to re-install automatically. You can find complete instructions from Microsoft on how to reinstall a plug-and-play device under Windows here.
If you are using a Mac, try a NVRAM/PRAM reset. This resets the system configurations for some audio and video related items and can many times help clear up problems related to audio. See Apple’s support page for information on how to do this. Also, be sure to check the App store to see if there's a newer version of Mac OS you could be running.
HD4 troubleshooting tips - Bluetooth
- Verify that the HD4 is connected to power and that the rear power switch is turned to the "on" position. If you haven’t already, power cycle your speakers by switching them off and back on.
- If your HD4 is already connected to a device via Bluetooth, the Bluetooth pair light on the front panel of the left speaker will be on and solid (note that if your HD4 has been idle and not connected to a device for more than 2-5 minutes, the Pair light will automatically turn off). Tap the Pair button, and it will begin blinking (or pair to your HD4 using your source device, and the LED will go from off to on and solid).
- Try playing audio from more than one application on your phone, tablet or computer.
- Check to make sure your source device (computer, tablet, phone, etc.) is running the most up-to-date version of software available.
- Disconnect from and forget the HD4 speakers in your device’s Bluetooth settings. Then, pair to the HD4 speakers again.
- Try using a different source device with your HD4 to see if the issue follows. Also, be sure to test your HD4's analog input.
- If possible, move your HD4 speakers to a different location to see if the issue persists. Nearby devices (such as a wireless internet router, mobile phone, halogen lamp, etc.) can sometimes cause interference in your setup.
We do not ship to forwarding addresses from our US-based web store. We do have retail partners worldwide though! Here's where you can find one near you:
https://audioengineusa.com/find-a-store/
The turnaround time for warranty claims outside of the US is subject to the distributor responsible for handling the claim. Each distributor works a bit differently, so this question is best answered by the person handling your claim.
The typical turnaround time from the time we receive the return, to the time we are shipping back out to you is about 5-7 business days. However, it is not unusual for us to get your repaired/replaced item on its way to you much sooner than that. We will notify you when we have received and processed the return, and again with the tracking information when we are shipping back to you.
If you are interested in becoming a distributor or authorized reseller of Audioengine goods, please send an email here.
If you would like to contact us about anything press or media related, please send an email here.
When your order is placed, you'll receive a confirmation email shortly thereafter. The shipping confirmation is sent once the shipping label has printed (typically within 1-2 business days), so the tracking information you receive may not update with a delivery estimate until FedEx physically has it in their possession. If you haven’t received your shipping notification yet and it has been more than 2 full days, please make sure you are checking the same email address that was used to place the order.
If your order has already been confirmed as delivered, the first thing to do is to check the front and back doors and surrounding area, and also check with your neighbors. Although uncommon, packages can get delivered to the wrong house. Keep in mind that shipping carriers occasionally mark packages “Delivered” before it has actually been dropped off. Please contact the carrier if it’s been more than two hours since you received a delivery notification.
The W3 Wireless Audio Adapter, which is part of the S8 Wireless Subwoofer system, will allow you to send music wirelessly from any music system with an audio output to the S8 Subwoofer.
Here are the two most common setups to make your S8 subwoofer wireless using the included Audioengine W3 wireless adapter kit.
Music System to S8 Sub using mini-jack audio output
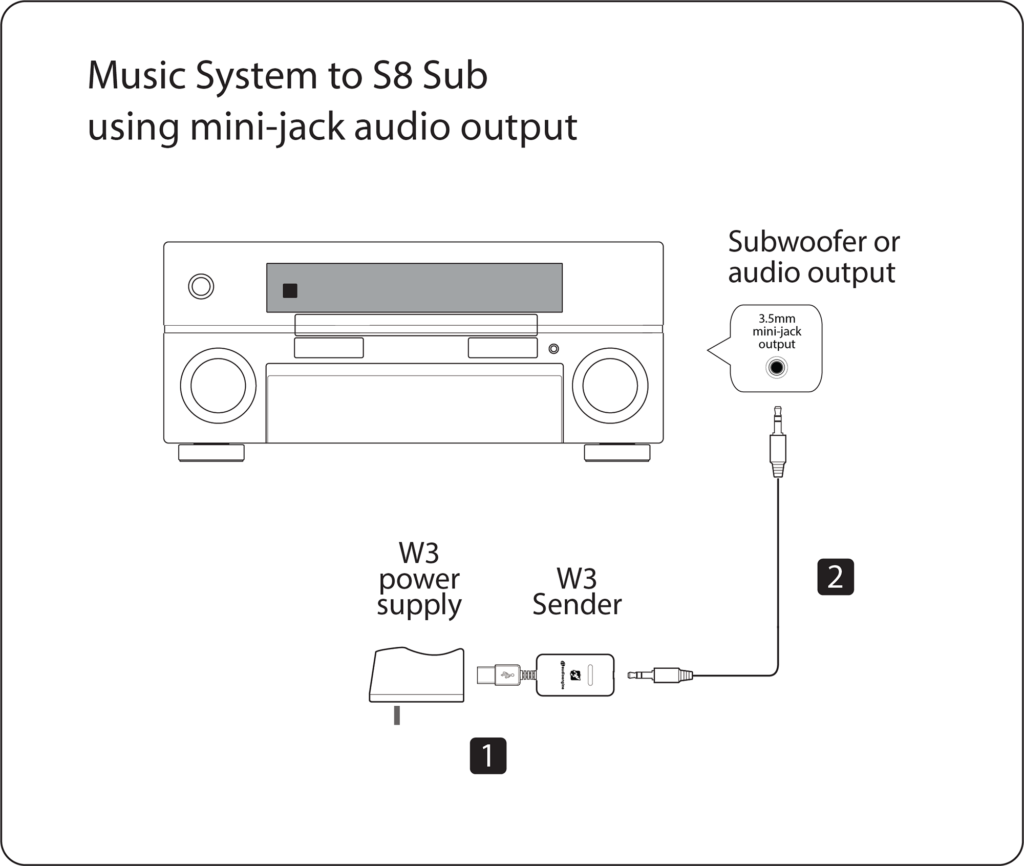
1) Connect the W3 power supply to the W3 Sender and plug the W3 power supply into a functioning AC power outlet.
2)Connect a mini-jack audio cable from the W3 Wireless Sender to your music system audio out or subwoofer output.
Wireless receiver connection to S8 Sub using mini-jack audio input
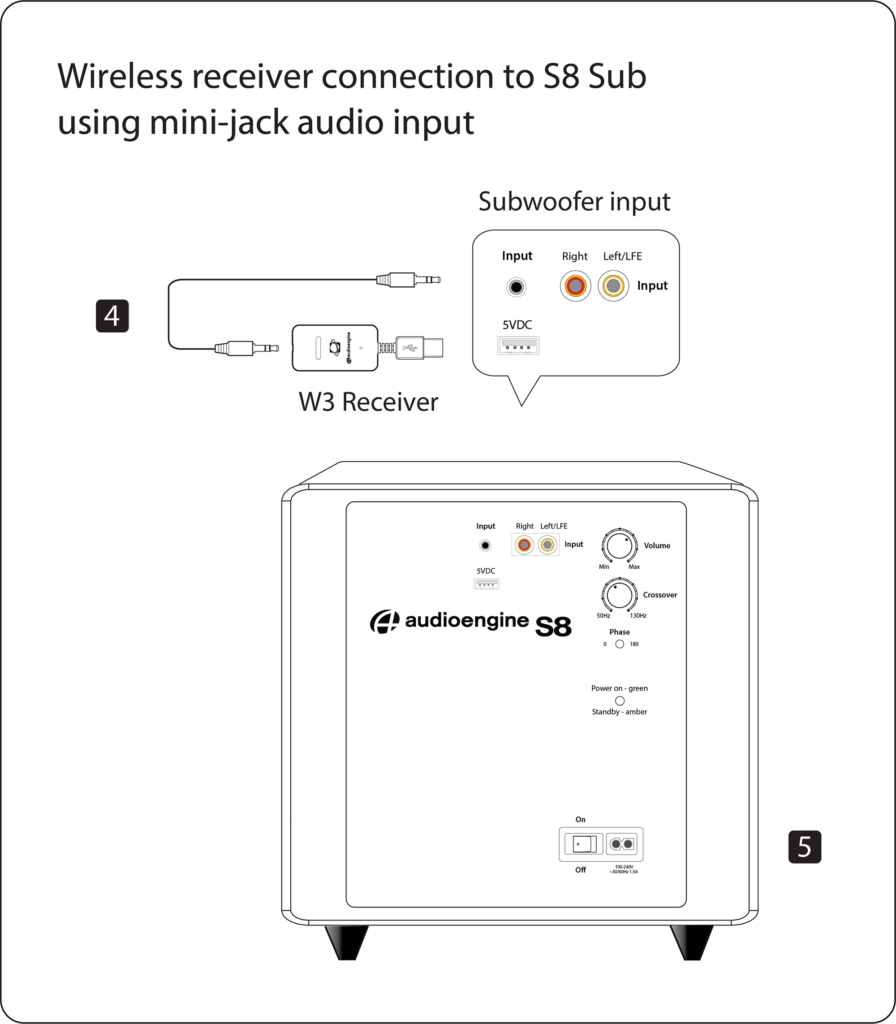
3) Connect the included mini-jack cable from the W3 Receiver to the audio input on the rear panel of the S8 subwoofer.
4) Power on the S8 subwoofer.
The status indicators on the W3 Sender and Receiver will both blink briefly and will then go solid, indicating they are paired and ready to play your music.
Powered Speakers or Stereo Receiver to S8 Sub using RCA audio outputs
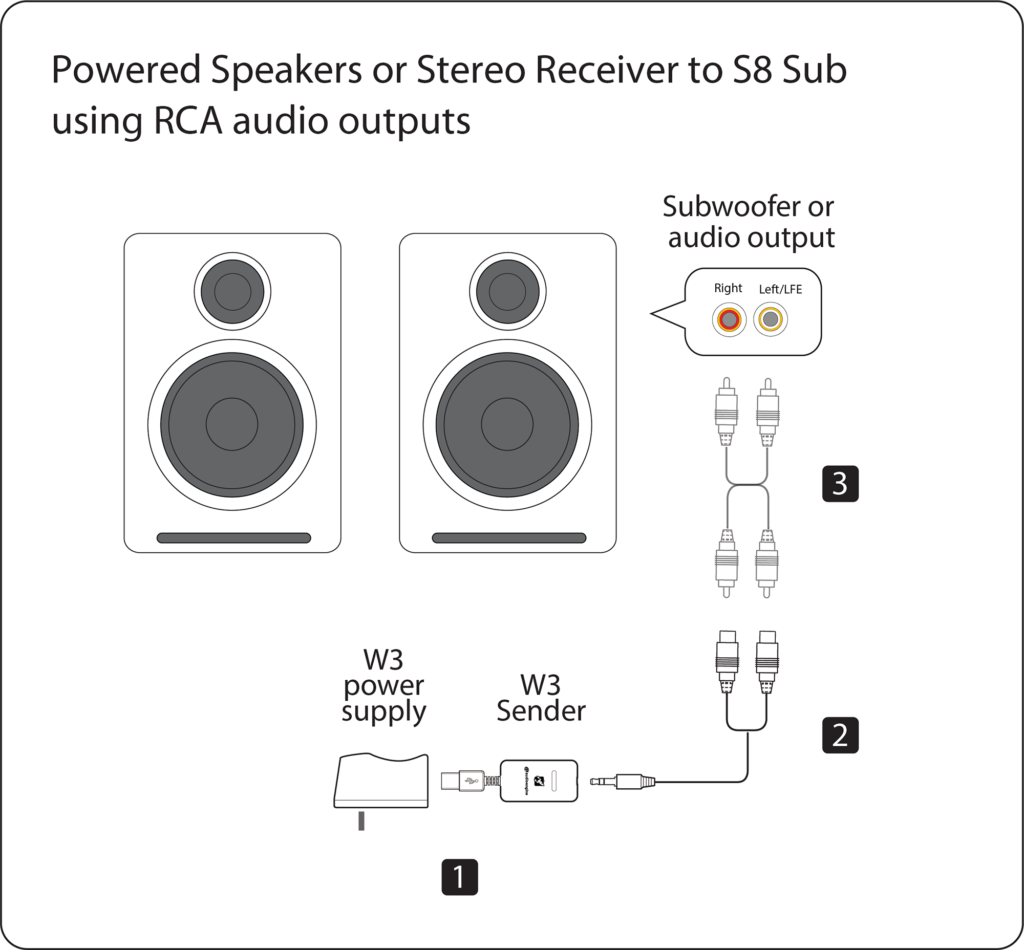
1) Connect the W3 power supply to the W3 Sender and plug the W3 power supply into a functioning AC power outlet.
2) If your powered speakers or AV receiver has RCA-style audio outputs or sub outputs, connect the included RCA adapter “Y” cable to the W3 Sender.
3) Connect an RCA cable (included with your powered speakers or AV receiver) between the RCA “Y” adapter cable and your music source subwoofer out.
Wireless receiver connection to S8 Sub using mini-jack audio input
4) Connect the included mini-jack cable from the W3 Receiver to the audio input on the rear panel of the S8 subwoofer.
5) Power on the S8 subwoofer.
The status indicators on the W3 Sender and Receiver will both blink briefly and will then go solid, indicating they are paired and ready to play your music.
For instructions on setting up the S8 Subwoofer, refer to the S8 Quickstart Guide.
The following troubleshooting tips can help diagnose and correct most concerns with the S8 Wireless. We have attempted to make this list as comprehensive as possible, so some of these may not apply to your issue, but please go through each tip.
If the power indicator on the S8 rear panel is not illuminated, try these tips:
- Verify that the AC power cord is connected to the S8 rear panel and to a working AC power outlet.
- Check that the power switch on the S8 rear panel is in the ON position and the volume control is not turned all the way down.
If the S8 is powered on but you are experiencing an audio-related issue, try these tips:
- Check that the cables from your music source to the S8 are properly connected by unplugging the cables and then reconnecting. Try using the mini-jack (Input B) as well as the RCA connectors (Input A) to see how the sub reacts.
- Check that the volume knob on the rear panel is not set to minimum volume.
- Verify that the volume levels of your audio source components, computer, etc are not set to minimum volume or powered off.
- If you are using any wireless adapters or other products with your sub, please remove the wireless device (temporarily) and connect the source directly to the sub.
The S8 Wireless uses a W3 for its wireless connection. The W3 is designed to "play nicely" with other wireless products but interference can happen, depending on the type of router(s) being used, other wireless systems in the area, your computer, building construction, etc.. If you are experiencing an issue with your wireless network or interference, here are some things that may help:
- Please try changing the channel of your Wi-Fi router to 1 or 11. This can be done with an Apple router using Apples Airport Utility software. On most other routers, these settings can be accessed by logging on to the routers IP address through a web browser.
- Please try to keep as much room between the W3s sender and receiver units, and other wireless devices as possible. At least 2 or 3 feet is recommended.
- Please try temporarily moving the powered W3 sender unit as close as possible to your wireless router. Leave it there for just a few minutes, and then place it back into your setup and retest. This may allow the W3 to train itself to "steer clear" of the signal.
- We have found that every now and then the placement of the computer's antenna in relation to the USB port can have this effect on the W3. One thing you could try is to move the W3 further from the computer by using a USB extension cable. - If using a Mac laptop, try the USB port furthest away from the display (the display is where the wifi antenna is located).
- Consider upgrading to a new wireless router if yours is older than 3 or 4 years. Newer model routers handle interference much better than older routers.