The following troubleshooting tips can help diagnose and correct most concerns with the A1-MR. We have attempted to make this list as comprehensive as possible, so some of these may not apply to your issue, but please go through each tip. If the problem persists and your A1-MR is located within the US, please provide us with the following information: serial number, purchase information (when and where), your current shipping address, and the results of each step.
If your A1-MR is outside of the US, we are unable to offer product services, but please use the link below to contact the distributor in the country where the A1-MR is located. Since the distributor is who will be assisting you from this point on, they will be able to let you know what options you may have. Be sure to still include your full name, where and when your A1-MR was purchased, the serial number, and your current shipping address when contacting any distributor:
https://audioengineusa.com/international-distributors/
If you haven’t already, power cycle your A1-MR by unplugging the power connection, and reconnecting it.
If the power indicator on the A1-MR is not illuminated, try these tips:
- Make sure the AC power cord is connected to the power supply unit and to a working AC power outlet.
- Check that the cable at the other end of the power supply is correctly connected to the rear panel of the left speaker.
If the power supply light is on but you are experiencing an audio-related issue with a wired connection, try these tips:
- Verify that the volume/power control on the rear panel is not turned all the way down or powered off (we recommend setting the volume to at least the 10 o’clock position)
- Check that the volume level of your audio source components or devices is not set to minimum volume or powered off.
- Check speaker wire connections from the left (powered) speaker to the right (passive) speaker. Confirm this by removing the speaker wire from each speaker and reconnecting. Also check the speaker wire polarity by verifying that the wires are going to the same terminals on both speakers.
- Check that the cable from your audio source to the speakers are properly connected. Confirm this by unplugging the audio cable and then reconnecting.
- Decrease the volume of the input audio source and increase the volume of the speakers.
- Try playing audio from more than one application on the source device you typically use to connect to your A1-MR (phone, tablet, computer, etc). Make sure the volume is up on your media players, internet radio, master control, device volume, etc. and the balance control is centered.
- Check to make sure your source device is running the most up to date version of software available. If an update is available, make sure you restart your device after the update is installed. For Mac users, be sure to check the App store to see if there's a newer version of Mac OS you could be running.
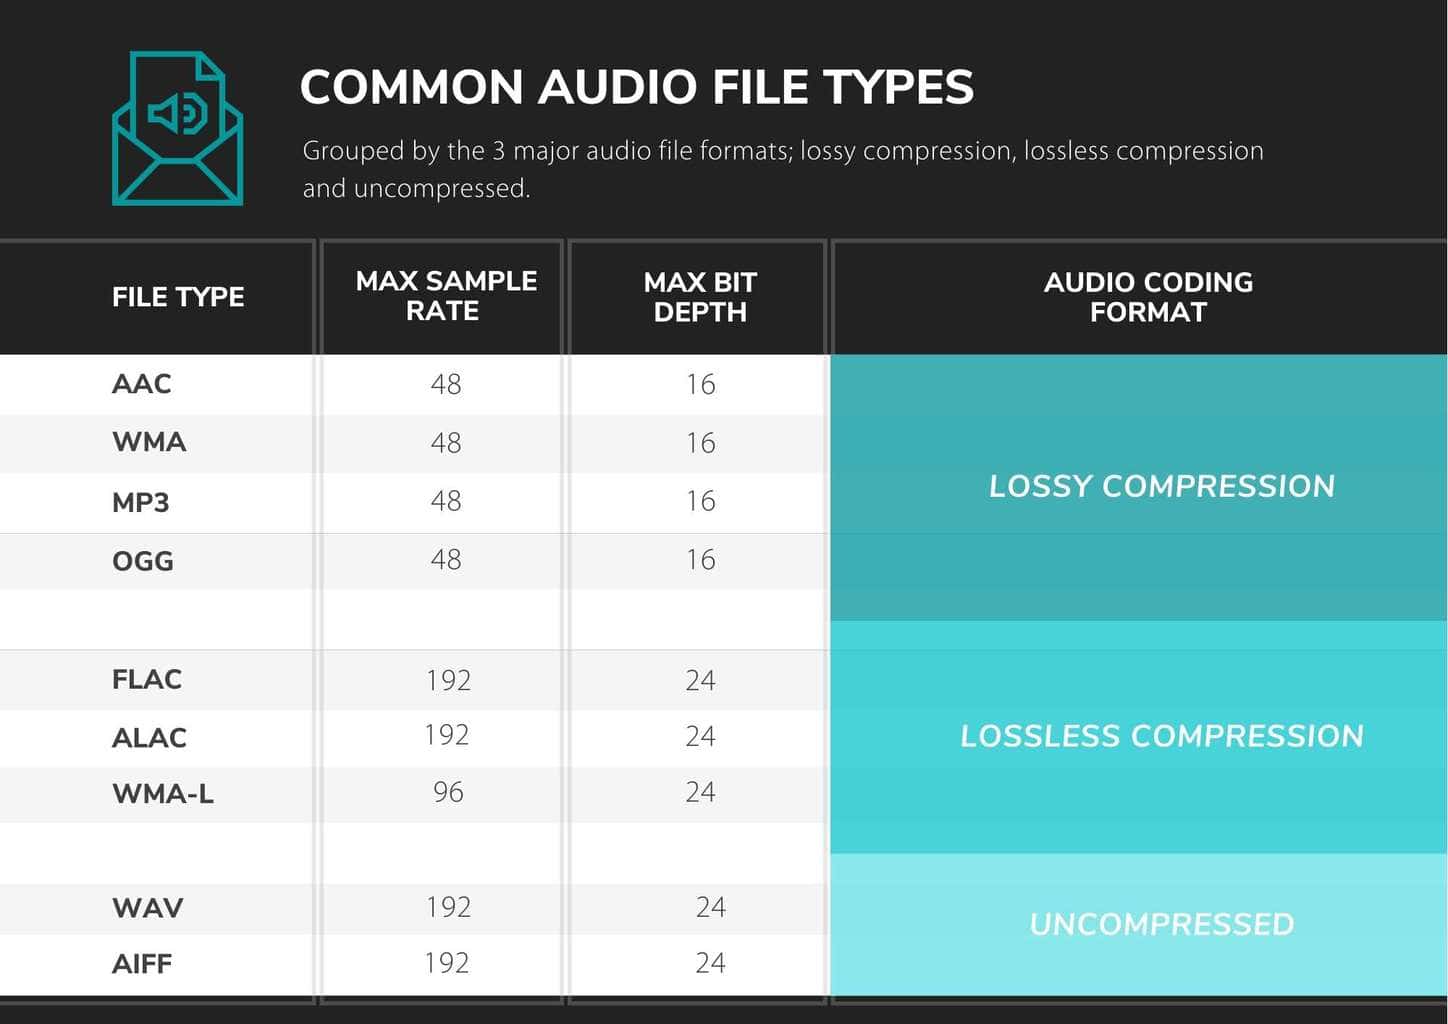
AAC
AAC (Advanced Audio Coding) refers to digital audio coding standard that represent audio files based on lossy audio compression. It was launched as successor of MP3 file format. AAC achieves better sound quality as compared to MP3 at the same bit rate. The format was adopted as default media format by YouTube, iPhone, iPod, iPad, Apple iTunes and several other platforms.
WMA
A .WMA file is a Windows Media Audio file. WMA is an acronym for Windows Media Audio. The files that contain the .wma extension are audio files that are used mostly for music. The WMA file format is proprietary to Microsoft. WMA files are compressed, similar to MP3 files. A lossless version of WMA does exist (WMA-L), but most WMA files use a lossy compression system.
MP3
The MP3 format is a compression system for music. The goal of using MP3 is to compress a CD-quality song by a factor of 10 to 14 without noticeably affecting the CD-quality sound. With MP3, a 32-megabyte song on a CD compresses down to about 3 MB. This lets you download a song much more quickly, and store hundreds of songs on your computer's hard disk. MP3 files are commonly used to store audio tracks, podcasts, lectures, sermons, and audiobooks.
OGG
An OGG file is a compressed audio file that uses free, unpatented Ogg Vorbis audio compression. It is similar to an .MP3 file, but sounds better than an MP3 file of equal size, and may include song metadata, such as artist information and track data. OGG files are supported by many software music players and some portable music players.
Vorbis is the most popular and common type of .ogg file, but there are numerous others. In addition to the .ogg extension, you may also see .ogv, .oga, .ogx, .ogm, .spx, and .opus.
FLAC
A FLAC file is an audio file compressed in the Free Lossless Audio Codec (FLAC) format, which is an open-source lossless audio compression format. It is similar to an .MP3 file, but is compressed without any loss in quality or loss of any original audio data.
ALAC
The ALAC file extension is short for Apple Lossless Audio Codec (ALAC). These files use M4A format because ALAC is a codec used for encoding audio data and not an audio file container format like an MPEG-4 file. These are audio files used for storing digital music in lossless format without losing any sound quality from the original audio data.
WAV
A WAV file is a raw audio format created by Microsoft and IBM. The format uses containers to store audio data, track numbers, sample rate, and bit rate. WAV files are uncompressed lossless audio and as such can take up quite a bit of space, coming in around 10 MB per minute with a maximum file size of 4 GB.
WAV files are generally going to be much larger than other popular audio file types, like MP3, due to the fact they are typically uncompressed (compression is supported, though). Because of this, they’re mainly used in the professional music recording industry to retain the maximum quality of audio.
AIFF
An AIFF file is an audio file saved in the Audio Interchange File Format (AIFF). It contains high-quality audio saved in an uncompressed, lossless format. AIFF files may also be saved as .AIF files or .AIFC files (if they are compressed).
Unlike .MP3 files, AIFF files are uncompressed. Because AIFF files' data is not compressed, AIFF files typically contain higher-quality audio than similar MP3 files. However, the files also take up more disk space since they contain more data.
The short answer is 'yes'. However, you will need to use an app that gives you the ability to use Airplay while in Windows. Though there are a few options out there, we've found TuneBlade to be one of the more affordable and easy-to-use applications available. TuneBlade is a simple tray utility that lets you stream system-wide audio to the B-Fi from your windows device. There’s a one-time fee of $9.99 to purchase the app, but they have a trial version you can try out for free.
To start, make sure your B-Fi is setup on the same network as your Windows device (PC/laptop). Once TuneBlade is installed, start the program. TuneBlade will automatically locate your B-Fi and any other Airplay-ready devices connected to your network.
Start playing the audio you wish to stream to your B-Fi(s). While the audio is playing, hit the 'play' button next to the corresponding B-Fi in the TuneBlade app. All audio coming from your computer will now be passed on to the B-Fi. While using TuneBlade, you can send the audio to multiple B-Fi's at once and the audio will automatically sync between B-Fi's without the need to group them in the Control App.
Things to keep in mind when using TuneBlade:
- If you have speakers directly connected to your computer, then turn them down (using the volume controls on the actual speaker) as there will be a slight buffering delay between the audio from your computer speakers and the speakers connected to your B-Fi(s).
- TuneBlade streams system-wide audio, so Windows notifications will be passed through when they occur.
- TuneBlade is a work-around we found offering Windows users the same streaming capabilities via Airplay that Apple users have.
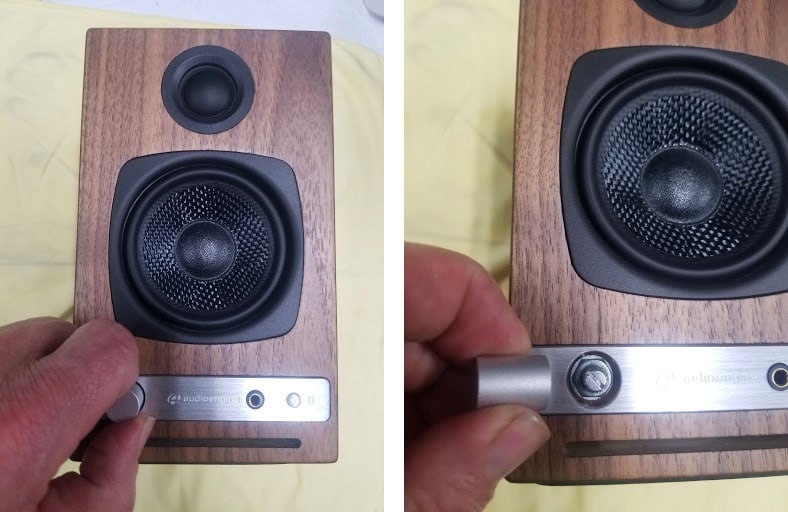
You may have a loose volume pot. This can happen when the nut that holds the volume pot in place becomes loose. This can be easily accessed and tightened without opening the speakers up. Try this:
1) Pull the plastic volume knob off the volume pot. Depending on how tight it's on, you might be able to pull it off with just your fingers. If not, you may need to cover the knob with a soft cloth and pull out with pliers.
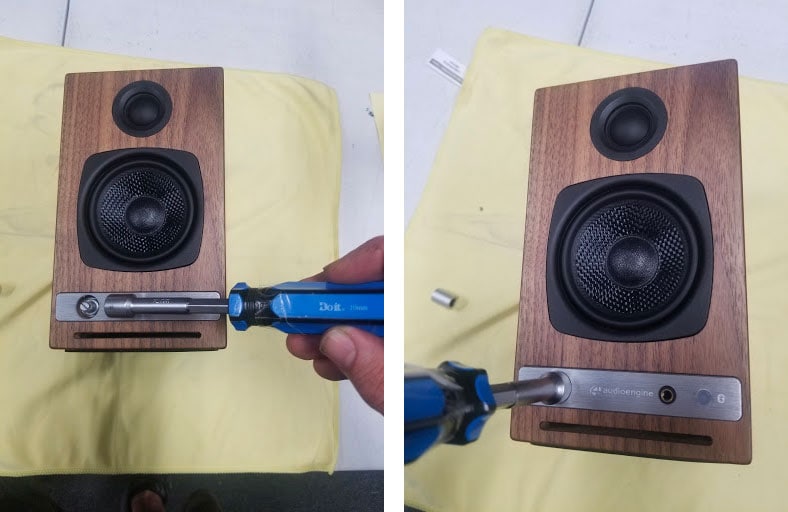
2) Use a deep well 10mm socket (or socket driver) to tighten the nut around the volume pots shaft.
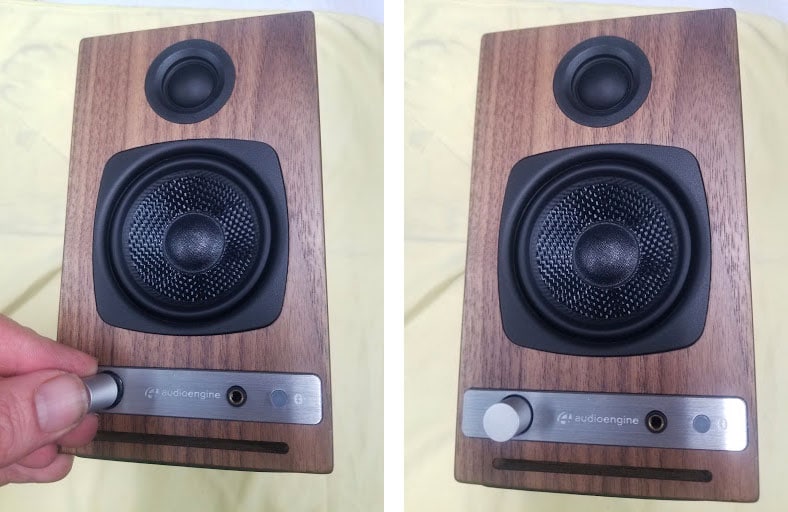
3) Press the plastic volume knob back over the volume pot's shaft, and retest.
Apple changed the way the iPhone and iPad connect to Wi-Fi networks starting in the iOS 14 and iPadOS 14 updates. This can cause issues when setting up the B-Fi on your network. To resolve this issue you would simply need to disable Private Wi-Fi MAC Addresses on your iPhone. The “Private Address” option is controlled separately for each Wi-Fi network. We don’t recommend disabling it for a network unless you need to do so (or are troubleshooting a problem.)
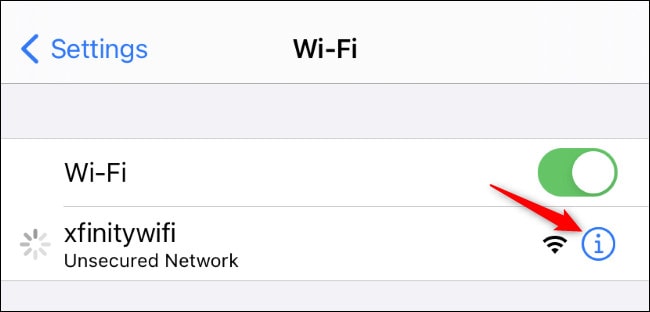
To find this option, head to Settings > Wi-Fi on your iPhone or iPad. Locate the Wi-Fi network you want to change this option for—it’ll be at the top of the screen if you’re currently connected to it. Tap the “i” icon at the right side of the Wi-Fi network name.
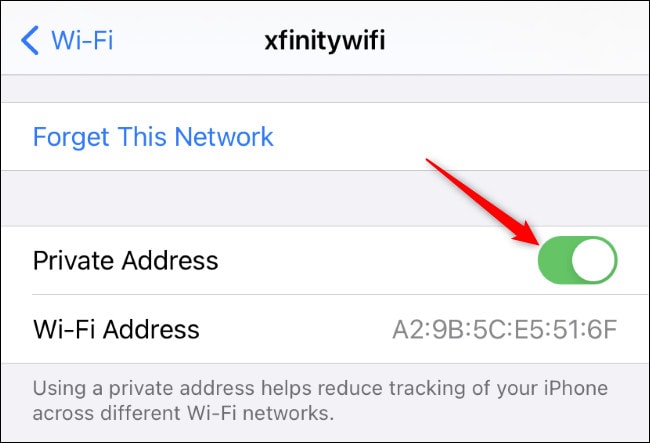
Disable the “Private Address” option by tapping the switch to its right.
The “Wi-Fi Address” option here shows you the private MAC address being used on that specific network, just in case you need it—to configure something on a router, for example.
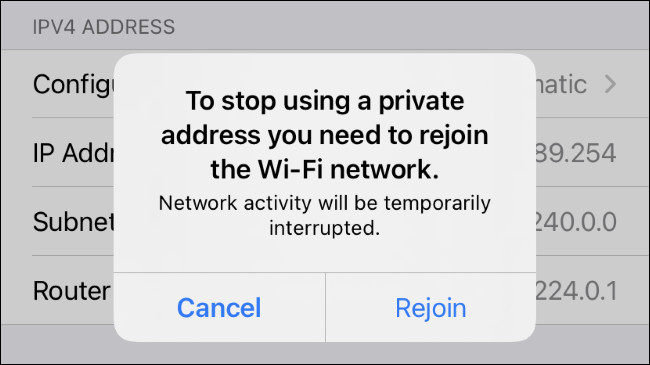
You’ll be prompted to rejoin the network if you’re already connected. Tap “Rejoin” and your iPhone or iPad will rejoin with a static MAC address necessary for the B-Fi to communicate with your device.
You should now be able to go back into the B-Fi Control App to complete the set up process.
Although we do not require a PIN for pairing to any of our products via Bluetooth, there are instances in which Windows requests this info. Entering '0000' should resolve this issue when you are prompted to do so.
At 20% battery life the 512 notifies you with a chime and reduces the volume level to preserve battery life. When the battery is charged above 20%, it will no longer auto-reduce volume to save power.
You'll need to make sure you have gone through the initial set up process for the B-Fi before moving onto the below steps.
For iPhone users:
1. On the iPhone, swipe to open Control Center. (the swipe direction is dependent upon the iPhone model you are using)
2. In the music control area, tap the AirPlay button.
3. A list of AirPlay capable devices seen by your iPhone will be shown. Tap the B-Fi to connect to it.
4. Once connected, you can use your iPhone to send audio to your B-Fi without the need to open the Audioengine Control App.
For Mac users:
Option 1:
- Make sure that your Mac and B-Fi are on the same Wi-Fi network.
- Go to Apple menu > System Preferences > Sound.
- Under Output, you should see a list of any devices you are able to AirPlay to, and the B-Fi should be an option. If you named the B-Fi during setup, it may appear under that name.
Option 2:
- Hold down the Option key on your keyboard, then click on the speaker icon in your menu bar. You will then see a list of audio output devices that are on your local network - select the B-Fi.
- Once you change the audio output to an AirPlay device, all audio coming from your Mac will go through the B-Fi, and not the internal speakers on your Mac.
- To change the audio output back to your Mac's internal speakers, you can either Option-click on the speaker icon again and select internal speakers, or go back into System Preferences and change it there.
-Make sure your speakers are not sitting on the same surface as your turntable as this can cause distortion in the audio.
-Check your tone arm to assure it is calibrated and balanced.
-If your turntable has a grounding cable, make sure it's attached to a nearby metallic source like an external phono preamp/stereo receiver/etc.
-If your turntable has a built-in bluetooth transmitter, make sure it is not both hardwired and bluetooth-connected to your Audioengine speaker system as this will cause a feedback loop. You can manually disconnect any bluetooth-connected source from your Audioengine speakers by holding down the bluetooth LED button for a few seconds till it starts blinking.
Once you have each B-Fi set up on your Wi-Fi network:
Open the Audioengine control app. Swipe from right to left in the app to the "Device" screen where your B-Fis are listed. Determine which group of B-Fis you want to be your primary, then touch the "+" in the upper right corner. A list of any additional A1-MRs you want to add will appear and you can tap the empty circle to add a check to the bubble, then tap "Done" You can add multiple B-Fis into that primary B-Fi for whole-home playback.
Step 1: Connect the speaker wire from the HD4 left (powered) speaker to the right (passive) speaker.
Step 2: Attach the wireless antenna to the HD4 rear panel.
Step 3: Insert the power cable into the HD4 rear panel and plug the other end into an AC power outlet.
Wireless Connection
Step 4: Turn on the HD4 power switch located on the rear panel. HD4 will automatically go into Bluetooth "pair mode" and the Pair button on the HD4 rear panel should start flashing.
Step 5: On your device (phone, tablet, laptop, etc), turn on Bluetooth and go to Bluetooth preferences.
Step 6: Select "Audioengine HD4" to pair and connect. The Pair indicator on the HD4 rear panel should be solid. Play your music and adjust volume levels on HD4 and your device.
Step 7: To add additional devices put HD4 back into pair mode by disconnecting HD4 from your device or by pressing and holding the Pair button on the HD4 front panel until the pair indicator starts flashing. HD4 can wirelessly connect to only one device at a time, however it will remember up to six different devices.
Wired Connection
Step 8: Connect one of the included audio cables to your music player (phone, tablet, computer, TV, etc) and the other end to an input on the HD4 rear panel.
Step 9: Play your music and adjust the volume on the speakers and your device to the desired listening levels.
For the full setup guide, download the attached PDF:
HD4 Quickstart Guide
Standard HD4 troubleshooting tips
The following troubleshooting tips can help diagnose and correct most concerns with the HD4. We have attempted to make this list as comprehensive as possible. Although some of these tips may not apply to your issue, please still go through each one.
-
- Verify that the volume/power control on the rear panel is not turned all the way down or powered off (we recommend setting the volume to at least the 10 o’clock position).
- Double check that your audio source is on and that its volume is not set to the minimum level.
- Check the speaker wire connections from the left (powered) speaker to the right (passive) speaker. Confirm this by removing the speaker wire from each speaker and then reconnecting them. Also, check the speaker wire polarity by verifying that the wires are going to the same terminals on both speakers (black to black, red to red, etc.).
- Make sure that the cables from your audio sources to the speakers are properly connected. Confirm this by unplugging the audio cables and then reconnecting them.
- Decrease the volume of the input audio source and increase the volume of the speakers.
- Try using different audio source devices to see if the problem follows.
- Try swapping your left and right speaker via the RCA left and right inputs to see if the issue remains in the same channel or follows the speaker.
- When using a computer with your HD4 speakers, make sure that the level is turned up on your various volume controls (media players, internet radio, master control, device volume, etc.) and that the balance control is centered.
- If your input source has its own EQ, then please make sure the low end is at a moderate level, as having too much bass can cause distortion.
- If you are using a wireless adapter, preamp, or external DAC with these speakers, then remove them temporarily and connect the audio input source directly to the speakers.
- Move your speakers to a different location to see if something is causing interference in the current setup. Something as simple as a wireless internet router, mobile phone or halogen lamp near the speakers can cause interference.
HD4 troubleshooting tips - Internal USB digital-to-analog converter
Try these tips if your computer does not recognize the speaker through your computer’s USB input. Additionally, try these tips if the sound through the USB input isn’t functioning correctly.
If you are using a Windows computer, uninstall the USB driver from your computer. Then, disconnect the USB cable to remove the HD4 from your computer and plug it back in to allow the USB driver to re-install automatically. You can find complete instructions from Microsoft on how to reinstall a plug-and-play device under Windows here.
If you are using a Mac, try a NVRAM/PRAM reset. This resets the system configurations for some audio and video related items and can many times help clear up problems related to audio. See Apple’s support page for information on how to do this. Also, be sure to check the App store to see if there's a newer version of Mac OS you could be running.
HD4 troubleshooting tips - Bluetooth
- Verify that the HD4 is connected to power and that the rear power switch is turned to the "on" position. If you haven’t already, power cycle your speakers by switching them off and back on.
- If your HD4 is already connected to a device via Bluetooth, the Bluetooth pair light on the front panel of the left speaker will be on and solid (note that if your HD4 has been idle and not connected to a device for more than 2-5 minutes, the Pair light will automatically turn off). Tap the Pair button, and it will begin blinking (or pair to your HD4 using your source device, and the LED will go from off to on and solid).
- Try playing audio from more than one application on your phone, tablet or computer.
- Check to make sure your source device (computer, tablet, phone, etc.) is running the most up-to-date version of software available.
- Disconnect from and forget the HD4 speakers in your device’s Bluetooth settings. Then, pair to the HD4 speakers again.
- Try using a different source device with your HD4 to see if the issue follows. Also, be sure to test your HD4's analog input.
- If possible, move your HD4 speakers to a different location to see if the issue persists. Nearby devices (such as a wireless internet router, mobile phone, halogen lamp, etc.) can sometimes cause interference in your setup.
HD4 is an all-in-one system with no extra components needed except your phone or computer. Simply place the speakers where you want them and connect the power supply. Hook up the included speaker wire from the powered left speaker to the right passive speaker. Then connect your music with the supplied cables - or go wireless - and that's it.